Over the past couple of weeks I’ve rebuilt my website on the static blog engine Jekyll and have setup hosting for it on AWS S3 using the static website feature.
It took information from several different documents to get the complete solution together, so I thought I’d do a write-up of the configuration and open-source my CloudFormation template as an example that you can use if you want to do something similar. The template is available from GitHub.
Goal
The goals for this solution were as follows:
- Static hosting for my website on the main URL http://www.brendonmatheson.com
- A mechanism to also redirect the following URL’s to the main URL:
- Infrastructure-as-code (i.e. CloudFormation) for all the above
- A CI/CD pipeline that will rebuild my site and efficiently push updates to S3 automatically
- Web access logs
Note that I’d prefer to use the “naked” domain (with no www) as my main URL but later we need to CNAME the domain name to the S3 bucket’s domain name, and you can’t CNAME a zone that contains other records like NS or SOA records.
We’ll go through how this is configured via the console first, then I’ll show you the CloudFormation template that automates the whole thing.
Static Hosting
Basic Setup
The basic static hosting part is dead easy and pretty well documented in Hosting a Static Website on Amazon S3 so I won’t go into deep detail on this part. At a high-level the process is:
-
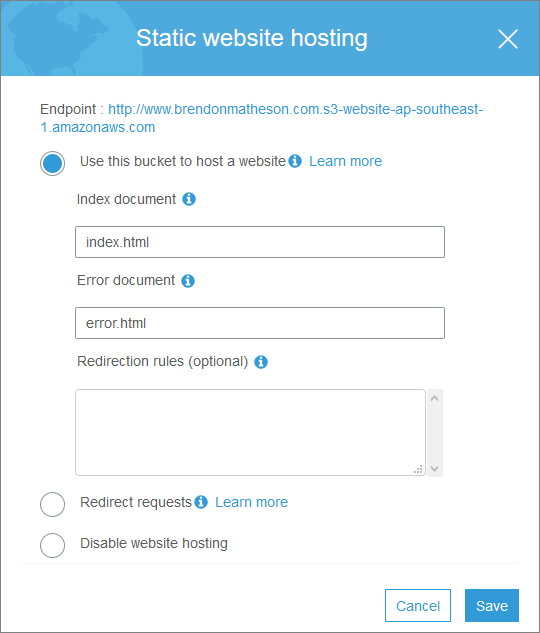
Create a bucket named with the hostname you want to use - e.g. I created a bucket called www.brendonmatheson.com
-
Enable static hosting including setting the index and error documents:
-
Add a bucket policy that allows public read access:
{
  "Version":"2012-10-17",
  "Statement":[{
	"Sid":"PublicReadGetObject",
        "Effect":"Allow",
	  "Principal": "*",
      "Action":["s3:GetObject"],
      "Resource":["arn:aws:s3:::www.brendonmatheson.com/*"
      ]
    }
  ]
}
- Point a CNAME for your domain name at the S3 bucket name. For example I’ve CNAME’d www.brendonmatheson.com to point to www.brendonmatheson.com.s3-website-ap-southeast-1.amazonaws.com
At this point you should be able to access your site through both the actual domain name, and also directly via the S3 bucket name. In my case these both work:
- http://www.brendonmatheson.com
- http://www.brendonmatheson.com.s3-website-ap-southeast-1.amazonaws.com
Logging
To enable logging for your site:
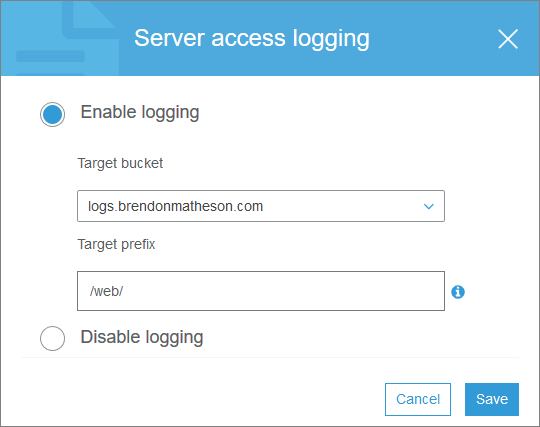
- Create another separate bucket - this one should be private. Mine is called logs.brendonmatheson.com.
- Under Permissions / Bucket Policy, define a bucket policy that will allow your account to write to the bucket - for example (remember to change 111111111111 to your account ID):
{
    "Version": "2012-10-17",
    "Statement": [
        {
            "Sid": "Permit access log delivery by AWS ID for Log Delivery service",
            "Effect": "Allow",
            "Principal": {
                "AWS": "arn:aws:iam::111111111111:root"
            },
            "Action": "s3:PutObject",
            "Resource": "arn:aws:s3:::logs.brendonmatheson.com/web/*"
        }
    ]
}
-
Now go back to the properties of your site bucket, and enable server access logging, specifying the logs bucket you just created as well as the prefix (path) within the bucket that you would like logs to be placed “in”:
Done. Now when you hit your site logs will be sent to your logs bucket - however note there can be quite a delay between the HTTP request and the log line showing up. It’s not like tailing your nginx log so give it some time when you’re testing this.
One note here - when you configured Server Logging the console made a cheeky update to your logs bucket - if you go back to the logs bucket properties and check under Permissions and Access Control Lists, you will find that the Log Delivery “canned ACL” has been added with permission to write objects and read bucket permissions:

This happens automatically when we use the console, but later when we write our CloudFormation template we must add this explicitly. It’s not super-clear from the setup documentation (as in not mentioned at all) that this happens however it is explained elsewhere:
Amazon S3 uses a special log delivery account, called the Log Delivery group, to write access logs. These writes are subject to the usual access control restrictions. You must grant the Log Delivery group write permission on the target bucket by adding a grant entry in the bucket’s access control list (ACL). If you use the Amazon S3 console to enable logging on a bucket, the console both enables logging on the source bucket and updates the ACL on the target bucket to grant write permission to the Log Delivery group.
Redirectors
Now for all of the other host names which we want to redirect to the main URL, we just:
- Create a private bucket named with the hostname you want to redirect from (e.g. bren.cc)
- Configure redirection under the static website hosting properties:
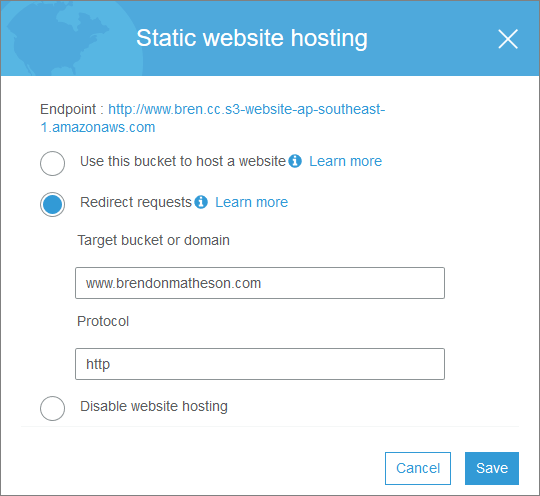
Do that for each source hostname, including www.yourmainurl.com.
Note I hit an issue here with my non-English domain name เบรน.com - S3 bucket names must begin with a Latin character! For now this is a blocker on using that Thai domain name but I’ll look into this further at a later date.
There are other options for rule-based redirection which you can read about in the docs on Configuring a Webpage Redirect.
Note this is not the only way to handle multiple hostnames - you can also achieve this with CloudFront. I elected not to use that option for cost and simplicity reasons. If you need CloudFront anyway for other purposes then it would make sense to handle your redirects there rather than having extra buckets.
Infrastructure-as-Code
Overview
Above we accomplished the following:
- Static website hosting
- Web logs stored in a logs S3 bucket
- Redirectors for other hostnames that forward to the main URL
This is excellent, but we did it all through the console which is really not excellent. We want this entire setup procedure to be codified in a CloudFormation template so that we can:
- Tear it down and set it up again at a moments notice
- Commit it to git and use git as our change tracking mechanism for all future changes made to this infrastructure.
My full template is open-sourced (GPLv2) on GitHub. Let’s look at how it works.
Parameters
For this solution it wasn’t critical to extract values to parameters since most values are only referenced once but I thought it made things cleaner anyway, and also if you want to adapt this template, you can largely just change parameters and then either add or remove redirectors as needed.
The parameters defined in this template are:
| Name | Value |
|---|---|
| LogBucketName | logs.brendonmatheson.com |
| LogPathWeb | /web/ |
| SiteBucketName | www.brendonmatheson.com |
| Redirector1Name | www.bren.cc |
Note that I’ve used the forwarding feature of my domain registrar to forward brendonmatheson.com to www.brendonmatheson.com and bren.cc to www.bren.cc which means I don’t need to handle redirection those “naked” domains in AWS.
Log Bucket and Policy
This config is simple - it creates a bucket with public access blocked and the same bucket policy we saw when creating the log bucket through the console.
ALSO remember we saw the auto-added ACL entry when we enabled logging through the console - in CloudFormation we must explicitly add that with the AccessControl: "LogDeliveryWrite" key.
  LogBucket:
    Type: "AWS::S3::Bucket"
    Properties:
      BucketName:
        Ref: "LogBucketName"
      PublicAccessBlockConfiguration:
        BlockPublicAcls: true
        IgnorePublicAcls: true
        BlockPublicPolicy: true
        RestrictPublicBuckets: true
      AccessControl: "LogDeliveryWrite"

  LogBucketPolicy:
    Type: "AWS::S3::BucketPolicy"
    Properties:
      Bucket: !Ref "LogBucket"
      PolicyDocument:
        Statement:
        - Sid: "Permit access log delivery by AWS ID for Log Delivery service"
          Principal:
            AWS: "arn:aws:iam::111111111111:root"
          Action:
          - "s3:PutObject"
          Effect: "Allow"
          Resource: !Join [ "", [ "arn:aws:s3:::", !Ref "LogBucket", !Ref "LogPathWeb", "*" ] ]
In case you’re wondering where the LogDeliveryWrite enum value comes from:
- The full list of canned ACL’s is provided here: https://docs.aws.amazon.com/AmazonS3/latest/dev/acl-overview.html#canned-acl
- The examples here show that the snake-case values are mapped to Pascal-case: https://docs.aws.amazon.com/AWSCloudFormation/latest/UserGuide/aws-properties-s3-bucket.html
Site Bucket and Policy
Also simple (actually this is all simple once you get it going). In this case it’s a public bucket with static hosting enabled:
  SiteBucket:
    Type: "AWS::S3::Bucket"
    Properties:
      BucketName: !Ref "SiteBucketName"
      WebsiteConfiguration:
        IndexDocument: index.html
        ErrorDocument: error.html
      LoggingConfiguration:
        DestinationBucketName: !Ref "LogBucket"
        LogFilePrefix: !Ref "LogPathWeb"

  SiteBucketPolicy:
    Type: "AWS::S3::BucketPolicy"
    Properties:
      Bucket: !Ref "SiteBucket"
      PolicyDocument:
        Statement:
        - Sid: "Permit public read access to the site bucket"
          Principal:
            AWS: "*"
          Action:
          - "s3:GetObject"
          Effect: "Allow"
          Resource: !Join [ "", [ "arn:aws:s3:::", !Ref "SiteBucket", "/*" ] ]
Redirectors
The redirectors each use the same repeated fragment of YAML. These buckets are created as private, and no bucket policy is required:
  Redirector1Bucket:
    Type: "AWS::S3::Bucket"
    Properties:
      BucketName: !Ref "Redirector1Name"
      PublicAccessBlockConfiguration:
        BlockPublicAcls: true
        IgnorePublicAcls: true
        BlockPublicPolicy: true
        RestrictPublicBuckets: true
      WebsiteConfiguration:
        RedirectAllRequestsTo:
          HostName: !Ref "SiteBucketName"
          Protocol: "http"
CI/CD
Existing Build Configuration
TeamCity is my home continuous integration workhorse and in TeamCity I already had a build configuration that ran a jekyll build to rebuild the website for every commit to master and to then publish the full site as a gzipped tarball. I also already had a “Deploy Staging” build configuration pipelined to run after a complete Build to publish the new version of the site to a nginx host on my LAN via SCP.
Access Control
My TeamCity instance has an IAM user in my AWS account with limited access to the resources it needs for deploys. In order to enable TeamCity to push updates to my main site bucket I added the following to SiteBucketPolicy in the CloudFormation template:
        - Sid: "Permit buildsystem to write to the site bucket"
          Principal:
            AWS: "arn:aws:iam::111111111111:user/buildsystem"
          Action:
          - "s3:*"
          Effect: "Allow"
          Resource:
          - !Join [ "", [ "arn:aws:s3:::", !Ref "SiteBucket", "/*" ] ]
          - !Join [ "", [ "arn:aws:s3:::" , !Ref "SiteBucket" ] ]
The build agents have the AWS CLI installed and have a named profile configured with the access key and secret key - since these agents are on my home network and not EC2, access credentials are required rather than using an instance role.
Deploy Script
Finally in TeamCity I created a new build configuration called Deploy Production which does the following:
Receives the tgz artifact from the Build pipeline stage and runs a bash script to unpack it to a directory called site/. This artifact is versioned, for example site-1.2.3.4.tgz:
rm -Rf site

filename=$(ls)
buildname=$(basename $filename .tgz)
tar xvzf $filename
mv $buildname site
Uses the sync command to synchronize the new build to the S3 bucket:
aws s3 sync site s3://www.brendonmatheson.com --profile buildsystem --delete
Sync means that if a file already exists in the bucket it won’t be redundantly transferred up, and –delete ensures that any files already on S3 that are no longer present in new build are pruned from S3.
Using aws s3 sync rather than a full copy operation saves time - note it doesn’t save S3 costs because inbound data transfer is free anyway - this is about saving time.
Conclusion
S3 is a cost-effective way to host a static site, and Jekyll is a great static blog engine. Together they make a good combination and with a little bit of CloudFormation and an automated build / deploy process you get a very efficient publishing platform.